Custom microphones are transforming classrooms, gyms, and live events. From education microphone OEM solutions to...
How to Maintain and Store Your Wireless Lavalier Microphone for Longer Life
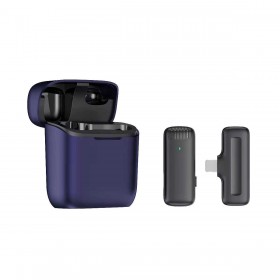
If you're investing in audio gear, especially a wireless lavalier microphone, longevity and performance should be top priorities. That’s where lav mic storage, consistent mic care OEM protocols, and reliable wireless microphone maintenance come in. Whether you're a content creator, OEM distributor, or AV technician, following proper upkeep practices isn’t just smart—it’s essential for preserving clarity, durability, and long-term value.
Why Proper Maintenance Matters
Modern wireless lavalier microphones are technical marvels—compact, sensitive, and capable of delivering high-quality audio in challenging environments. But they’re also delicate. Without the right mic care OEM procedures and lav mic storage habits, even the best systems degrade fast.
From sweat and dust to signal interference and connector wear, a poorly maintained mic can cost you more in repairs and replacements than you'd ever spend on prevention. So, let’s dig into the wireless microphone maintenance blueprint that keeps your gear sounding crisp and working like new.
1. Daily Cleaning and Surface Maintenance
Routine cleaning is your first defense.
After each use:
• Wipe down the mic body, transmitter, and receiver with a microfiber cloth.
• Avoid moisture buildup around buttons and ports.
• For sweat-heavy environments (like theater or fitness), lightly dab exposed parts with an alcohol-free electronic-safe cleaner.
Mic care OEM standard: Use non-abrasive wipes and avoid paper towels. Paper can scratch plastics and leave fibers in ports.
Clean lav clips and foam windscreens as well:
• Remove foam covers weekly and hand-wash with mild soap and warm water.
• Allow them to dry completely before reuse to prevent mold.
These simple steps not only improve hygiene but extend your wireless lavalier microphone’s working life.
2. Cable and Connector Care
The cable is often the first point of failure.
Here’s how to handle it properly:
• Never yank the cable from the mic or pack.
• Gently loop cables when coiling—avoid sharp bends.
• Inspect connectors for bent pins or corrosion.
One of the most underrated wireless microphone maintenance tricks is using color-coded or labeled cables. This prevents mix-ups in multi-mic setups and helps you track wear over time.
Pro tip: If your mic uses screw-on connectors (common in pro OEM builds), check them regularly for tightness. Loose connectors degrade audio and introduce signal noise.
3. Battery Care for Wireless Systems
Bad batteries ruin good performances.
Follow these rules:
• Only use recommended battery types (alkaline or approved rechargeables).
• Store batteries separately when not in use.
• Don’t leave batteries inside the transmitter between gigs—it shortens lifespan and risks leakage.
• Keep spares in a cool, dry case and rotate them to track usage evenly.
As part of your mic care OEM checklist, log battery runtime for each unit. If runtime starts dropping, it may indicate internal mic damage or poor battery performance.
4. Proper Lav Mic Storage Techniques
Storage isn’t just about a drawer. It’s a full system.
Here’s how to store your wireless lavalier microphone the right way:
• Use hard-shell cases with custom foam inserts to prevent shock damage.
• Store cables loosely wrapped to avoid memory bends.
• Label each mic, transmitter, and accessory for easy tracking.
Avoid:
• Storing in plastic bags (they trap moisture).
• Leaving gear in cars or direct sunlight.
• Keeping mics near magnetic fields (e.g., speakers or power amps).
Lav mic storage tip: Include silica gel packets inside your mic case to absorb ambient moisture and protect electronics.
5. Seasonal and Long-Term Storage Protocols
If your mic won’t be used for more than a week:
• Remove batteries immediately.
• Perform a soft clean.
• Wrap cables individually.
• Store everything in a temperature-controlled space (ideally 60–75°F, low humidity).
For OEMs or equipment rental companies, it’s smart to create a quarterly wireless microphone maintenance schedule:
• Deep clean all foam parts.
• Inspect solder joints and antennas.
• Recalibrate or test for signal integrity.
Mic care OEM practice: If you're shipping gear to clients, include a storage care sheet and desiccant pack in every mic box.
6. Environmental Factors: What to Avoid
Your wireless lavalier microphone is vulnerable to more than just drops.
Here’s what to steer clear of:
• Moisture: Rain, sweat, fog machines. Always use a waterproof pouch or cover when conditions are risky.
• Dust and Sand: Outdoor shoots can grind tiny particles into connectors and switches. Use windscreens and pouch the gear immediately after use.
• Heat: Avoid storing mics near lighting rigs or inside cars. High temps degrade batteries and melt cable insulation.
• Cold: Freezing temps make cables brittle and can fog up mic internals once brought indoors.
As part of any serious wireless microphone maintenance routine, train your team to identify risky environments and prep the right protection.
7. Transport Like a Pro
Your mic should be stored as carefully on the move as it is on a shelf.
Best practices:
• Use padded mic bags or custom Pelican cases with labeled compartments.
• Keep transmitters and receivers in separate slots to prevent button damage.
• Avoid stacking heavy gear on top of mic cases during transit.
Lav mic storage travel tip: Invest in travel-friendly coil winders to store cables without kinking them.
8. When to Service or Replace Parts
Even with great care, gear wears out.
Know when to replace:
• Windscreens: Every 3–6 months depending on use.
• Cables: At the first sign of exposed wire or inconsistent signal.
• Battery packs: After 300–500 charges (or when runtime falls by 30%).
Signs it’s time for mic care OEM servicing:
• Dropouts in clean environments.
• Sudden static with no interference nearby.
• Loose jacks or antenna issues.
Your vendor or OEM partner should offer support for replacement parts, testing, and diagnostics. If not, we do.
9. Label Everything—Seriously
Color-coding and labeling gear is essential for team setups, rentals, and event prep.
Use:
• Label tape for channels or names (e.g., Host 1, Talent 2).
• QR codes linking to maintenance logs.
• Cable tags for quick troubleshooting.
This part of your wireless microphone maintenance system saves hours during tech rehearsals and field work—and keeps everyone accountable for handling.
10. Create a Maintenance Checklist
Here’s a sample wireless lavalier microphone maintenance checklist to keep your team consistent:
After Each Use
• Wipe down components
• Check battery level and remove if storing
• Coil cables and store in labeled case
Weekly
• Clean windscreens
• Inspect cables and connectors
• Log runtime and performance
Monthly
• Deep clean transmitter/receiver housing
• Test backup systems
• Recalibrate or frequency-scan in different venues
Quarterly
• Replace worn parts (cables, foams)
• Full system test
• Rotate or replace rechargeable batteries
This structure helps enforce proper mic care OEM standards across any production team or rental house.
Conclusion: Build a Culture of Care
Whether you're a solo podcaster or an OEM mic distributor, taking wireless microphone maintenance seriously pays off. It extends gear life, improves sound consistency, and reduces last-minute failures that kill productions.
With smart lav mic storage, detailed mic care OEM protocols, and regular checkups, your wireless lavalier microphone can deliver pro-level performance year after year.
We build and support custom wireless lav systems tailored for high-performance use and long-term durability. Looking for rugged, repairable, OEM-grade gear? We can help—from design to delivery, maintenance to training.
Contact us today for custom mic solutions built to last.










Latest comments